
Making Invisible Masonry Repairs
"Today much good brickwork is spoilt by very inferior jointing and pointing. Many bricklayers lack finesse in this all important process, which is in consequence ill-timed, heavy handed and not true in style or execution. A well jointed or pointed wall will be neat and precise in finish, no stains will mar the brickwork, and the finished joints themselves will not be obtrusive. The observer's eye should not be drawn to the mortar, but to the whole of the brickwork." - Gerard Lynch, Brickwork, Vol. 2, p 126, 1994
Introduction to the Process
In trying to repair historic masonry, you are faced with many challenges. First, you must understand the way the original masonry was constructed and tooled so you can reproduce it. This cannot be a theoretical knowledge. You actually have to be able to carry out the work. You must study the best preserved portions of masonry to determine which tools were used, how they were used, and in what sequence. The necessary tools probably won't be available - certainly not at the local masonry supply store - so you need to be prepared to make them yourself. You must also be able to accurately replicate the original composition of the mortar or mortars.
You can never exactly duplicate the original craftsmen's efforts because their work was carried out as the building was being constructed, and you are only repeating parts of that process. For instance, cleaning and re-setting bricks at random in a wall by half bedding and half pointing them is very different than building a wall by stacking one brick on top of another. In some ways the repairs can be more difficult than building new.
The final challenge is to determine what your finished work will look like. For years I have seen brick and stone buildings being pointed with little regard for the original tooled surfaces that are still evident. Instead the masons get by with flat or concave joints that are either overfilled or slightly recessed and meant to imitate the most bland, worn, and weathered mortar joints at the very base of the wall. If this process continues, we eventually lose all of the tooled surfaces that are such an important part of the original builder's statement. It is our responsibility to take this aesthetic and history seriously. In order to make repairs that are complementary and appropriate to the aged materials, you must first create the replica joint and then age or weather it slightly and believably.
In this article I will go over the basics of historic masonry repairs, using our work at the Hammond Harwood House (Annapolis, 1774-) as a model. At the Hammond Harwood House we first achieved a pristine replica 18th century joint, and then weathered it through a variety of steps to achieve a finished pointing that blends in nicely with the surrounding untouched original mortar.
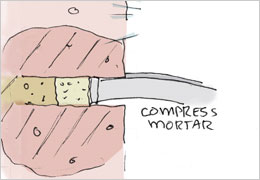
Basics of Lime Mortar for Compression Masonry
Well-calcined high-quality lime is usually very white. Some lime putties on the market these days are touting their off-white, almost tan color. These lime putties are from poor quality limestone or are improperly fired. The quality of the lime component is the most crucial since it is the binder that holds the mortar together, so never skimp here. However, the aggregate is also essential to the appearance and, more importantly, the durability of the mortar.
The key to good cement-aggregate ratios is obtaining a range and distribution of particle sizes that will fill in nearly all the voids. Imagine a box filled with tennis balls, golf balls, marbles, and lead shot - the different sizes ensure the maximum point-to-point contact between the aggregate particles and the minimum of cement necessary to bind the particles together.
A properly done mortar analysis provides useful information about the aggregate, but most mortar analyses do not address this. Fortunately it is easy to do a simple analysis on site and gain valuable information for replicating the appearance of the mortar. Sieving information is extremely important to the durability of the mortar and is a fairly low-tech activity that requires only time and practice to learn to do well. After acid digestion it is important to look closely at the sand and the fines. These components will largely create the color of the mortar. The fines determine an overall shade or hue and the sand contributes to the weathered color and texture. Coloring of mortar should be achieved with sand and, to a lesser degree, similar fines. Excessive clay fines may weaken mortar, so for the sake of durability I sometimes replace significant clay proportions in original mixes with more stable iron oxide pigments. However, the coloring should not come from using completely inappropriate sands and trying to get all of the mortar match from pigments, as this is unnecessarily expensive and never weathers to match the surrounding mortar appropriately.
Typically there is no commercial sand available that matches exactly, but I have found that by selectively sieving several sands, I can pull the appropriate range of both particle sizes and colors out of sands that otherwise would be the wrong color and recombine them for a good match. This is easier and less time consuming than it sounds. In fact, sieving sands was common at least as early as the 17th century. Joseph Moxon's 1703 treatise Mechanick Exercises or the Doctrine of Handy-Works lists among the bricklayer's tools "Sieves, of several sorts, some larger, others lesser, some finer, others courser, to sift the lime and sand withal, before they wet it into mortar or lime and hair."
At the Hammond Harwood House, the sand in the original mortars did not vary much. We were able to track down several local beach sands that were similar to the original, and with careful sieving and recombination of parts of each sand we produced a match to the original both in color range and particle size distribution. We also found that the lime mortar used in laying up the bricks was not the same mortar on the surface of the tooled joints. The surface mortar had a higher lime content and a finer grading of the same sand used for bedding. The grading was altered both to allow ease of tooling and to augment the appearance.
One more word of caution: many people overwork the surface of their mortar by slicking it too much. Over-tooling leads to excess lime on the surface and a plane of aggregate just below it that has been starved of its cement binder. This can create a weak plane below the surface that has the potential to fail later for a variety of reasons, especially freezing. Also, the appearance certainly won't match the rest of the building. We usually will age mortar slightly within a day or so of applying it by hitting it moderately with a stiff bristle brush to open the surface a bit and expose the aggregate. (The exception to this is decorative pointing with a graded sand and higher putty content.)
Cover your work from weather - hot sunlight, but in particular rain - for a few days until you get surface carbonation (light color and hard surface). After this, I am convinced that exposure to rain will actually increase the rate of carbonation beneath the surface, so do not be overly cautious about long-term protection of your joints except when temperatures are continuously below freezing.
Steps to Replicating Historic Pointing
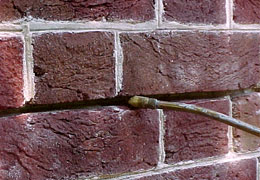
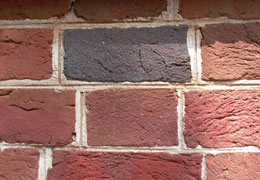
First, carefully inspect the mortar joints throughout the house and note differences in types of original mortar, workmanship, and tooling at different places on the main block (particularly between front and back facades and the sides, as well as above the belt courses). Even more variation may be visible on the hyphen and wings. Next, examine the weathering that has taken place. At right is an original and largely pristine protected joint from the Hammond Harwood House. Clearly this joint was originally cut downward to expose the aris below while a thin smear of pointing mortar rode onto the brick above. In the intervening years, the exposed areas of the building have weathered, and the joints have aged principally from acidic rainwater cutting back the mortar at both top and bottom arises. The replication must mimic this weathering.
At the Hammond Harwood House, once we were within 3/8" of the brick faces we used shallow lifts applied in fairly quick succession before water had been drawn into the masonry, to allow ease of striking. We followed this with the final 1/4" pointing mortar that actually stands proud of the brick faces until fully tooled.
As mentioned above, analysis of protected early joints at the Hammond Harwood House showed that the final lift of mortar was higher in lime content and had more finely graded sands. To give our mortar greater durability, we maintained the same 1:3 ratio, but sieved the sand to a finer mix (although still with a good distribution of particle sizes) to allow the joint to be struck easily. We also beat each trowelful of mortar heavily - until the texture resembled whipped cream cheese - before lifting it to the wall, to increase both plasticity and workability. Most importantly, this last lift of mortar was laid on (as opposed to pressed into) the joint so the water would not be drawn out of it too quickly. We used the following steps to tool and weather the joint, quickly pressing the mortar into contact with the lower pointing mortars to ensure good bond. Timing is everything for this process.
Now that you have thoroughly studied the mortar, workmanship, and weathering, you are ready to begin work.
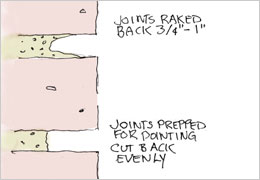 |
1. Scrape the background mortar remaining in the joint back to a minimum of one inch, squared to the back of the joint. |
 |
2. This mortar and the surrounding masonry must be hydrated adequately, but not excessively - wet brick faces will lead to a smeared mess. It is important to spray the joints about an hour in advance, and in hot weather again 10-15 minutes before pointing begins, to ensure that the internal masonry is damp, but the brick faces are fairly dry. This should allow easy cleanup with a stiff brush once any stray mortar on the faces has dried. |
 |
3. Mortar should be lifted off the trowel at the depth and height desired in the joint to eliminate squishing mortar across the surrounding bricks or losing half of it on the ground. This is done by smoothing a layer of mortar to the desired thickness on your trowel beforehand. |
 |
4. We lay lifts of bedding mortar in at 1/2" deep intervals, then wait from 30 minutes to several hours (depending on the weather) until much of the free water has been drawn into the surrounding masonry. At that point we return to beat or compact the mortar. This ensures a dense mortar free of voids. |
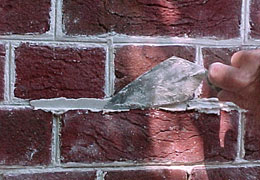 |
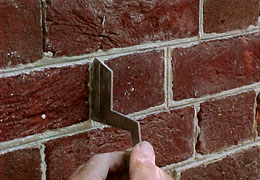
5. Begin tooling of the joint by using a flexible trowel to press in the lower edge of the joint along the aris of the bricks below. Specifically, the trowel is flexed against the top of the upper brick while allowing the tip to cut in 1/32" beyond the arris of the bottom brick. |
 |
6. Quickly scrape off excess mortar before it can be smeared by the next step. High-quality, well-beaten lime mortar will not soak in and stain dry brick faces, so it can easily be removed. At this stage in original pointing, the straight edge would have been used to strike the joint - but since we are imitating weathering of mortar along the aris of the upper brick, we must first add an extra step. |
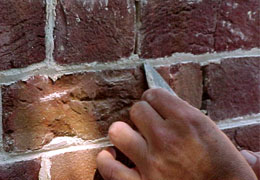 |
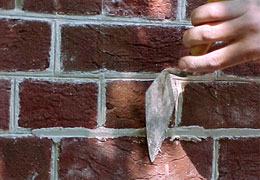
7. Use the tip of the trowel to trim back under the lip of the brick aris to mimic years of acid rain etching at the brick-mortar boundary. Gently slick the surface of the joint again with the weather-edge cut down (similar to step one), using a very light touch since too much pressure now would make the mortar too dense for the next step. |
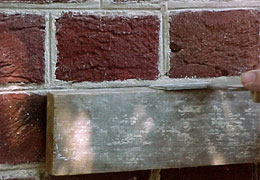 |
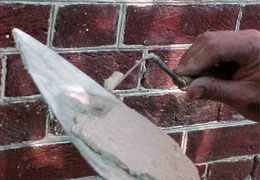
8. Strike the joint using a three to four foot long straightedge to guide the striking tool to a clean and even slice through the center of the joint. Cutting such a thin line with the guidance of a straightedge gives a delicate sense of proportion. It also produces a shadow line through the center of the joints that has profound visual impact on the masonry. The effect imposes a sense of uniformity on somewhat rustic, irregular materials. |
 |
9. For this joint to come out clean, sharp, and cut to a consistent depth requires good timing, the right pointing tool, appropriate pressure, and considerable skill. Miscalculate and within minutes the mortar has dried so much that it won't take the imprint of a tool. |
 |
10. Once the surface has begun to carbonate and the brick faces are completely dry, it's time to weather the joint. Brush the bricks free of any loose bits of mortar and tap the joint faces vigorously at the diagonal with a stiff brush (preferably a churn brush) to expose the aggregate. About a week later, wet the joints and apply a mild vinegar bath, followed by a brushed-on application of "dirty" pigments to imitate the build-up of dirt. |
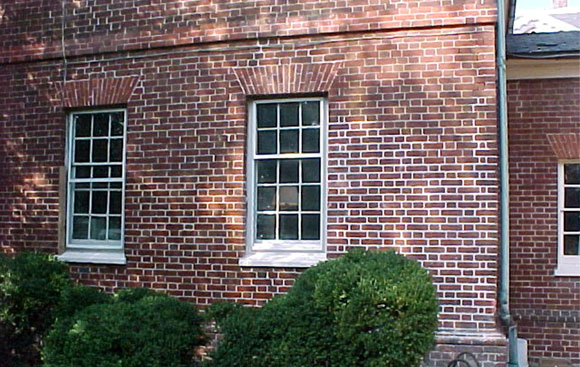
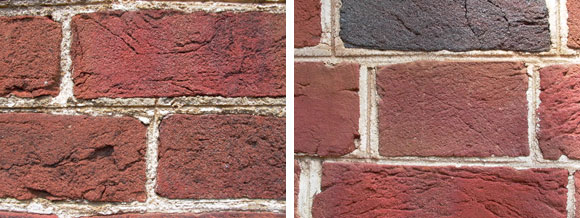
The photograph above shows our aging process in stages on the garden elevation of the North wing at the Hammond Harwood House. On the left, the process is complete and the totally dismantled and rebuilt lower wall is nearly indistinguishable from the surrounding original mortar joints. In the middle, the first cleaning pass has been made and the first of two applications of pigments has been brushed on. On the right side of the photograph, pointing is complete, but weathering of the joints has not begun.
Our re-pointing is nearly imperceptible, even though it lacks 225 years of natural weathering. The re-pointing masks the fact that much of the lower seven feet of visible wall was completely dismantled and relaid with larger joints due to grinder damage done by earlier repair attempts. Our work on the Hammond Harwood House shows that even when faced with challenges like these, invisible masonry repairs are possible.